Our site uses cookies to give you the best experience. or continue shopping if you're happy.
Accept & closeTop tips: Working with what you've got
How to transform a dated kitchen and bathroom with some thrifty but very effective tricks!

This is the second installment in our new series to AO at Home, The Rented Home, where we look at ways to create a perfect home even when you don’t own the bricks and mortar. Alex Outhwaite takes us through her own journey of turning a rental property into home and offering her personal experience and insights along the way. Part One, Finding The Perfect Rental can be found here.
In the first article in this series, I discussed ways of finding a rented home that you can make your own, so now comes the next consideration for decor-enthused tenants – working with what you’ve got.
Everyone’s home has limitations – no, let’s call them challenges – but for renters they may not be as easily overcome as they are for owners. Even the most liberal of landlords may place some restrictions on what you can do, and even if they don’t it may feel a step too far to invest heavily in someone else’s property.
Our flat is not perfect and at times, I catch myself fretting over the woodchip wallpaper, dated kitchen or outset gas fire but there are things you can do to freshen your place up even when faced with these kinds of decorating obstacles.
Here are a couple of simple, thrifty ideas that we’ve tried out:
Updating the Flooring
This makes a huge difference. When we moved in, the kitchen and bathroom were floored with the same ugly brown vinyl. Now some readers may recoil from the idea of vinyl – indeed, I did once too – but let me try to persuade you of its merits.
Vinyl is comfortable, hygienic, inexpensive, easy to fit, and comes in an amazing array of patterns and colours. We bought some new end of roll remnants on eBay in a fantastic tile effect – check out the difference it has made to our bathroom.
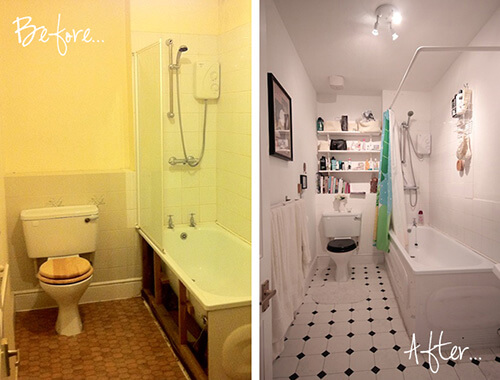
The best thing about it for renters is that you don’t need to do any fitting or nailing or gluing. Just cut it to the right size and lay it out. You can cover up the existing flooring and simply remove it when you end your tenancy.
The rest of the flat is carpeted in an inoffensive beige, which is really lifted by a rug here and there.

Good rugs may not always be cheap (though bargains can be had in antique shops), but they are a good investment, as they are all yours and can go with you when you leave. Yes hardwood and tiles would be more elegant, but let’s face it, they’re antisocially noisy if you have downstairs neighbours. Also carpets and vinyl make this a flat very cheap to heat!
Covering Up
The easiest and most obvious way of giving an instant lift to a room is a new coat of paint, but you don’t need me to tell you that. If your landlord will let you paint, go to town. Just be prepared to return it to a neutral colour at the end of your tenancy. What about less easily altered features?
We never took a before pic of our kitchen (you can tell neither of us uses Facebook, we just don’t think to document our life in photos!), so I created an uninspiration board to give you a feel for it (It would have been lovely in 1991 I’m sure).
With our amazing landlord’s permission we painted the cabinets, put in new vinyl flooring and removed a large cupboard to improve the layout.
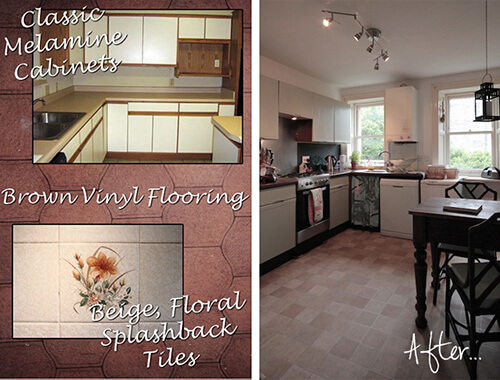
But what could we do with the tiles? Well, this.
By simply cutting plywood to size and painting it with chalkboard paint, our new splashbacks are fun, and give the kitchen a dramatically different look. We could easily repaint the plywood if we wanted to try something else (stencils would work well with this idea), and the boards are attached with a light-bond glue, so they’re easy to remove.
As for the woodchip wallpaper, well there’s not much to be done about that, except cover it up with art, photos and wall hangings. It’s a work in progress in a flat with such big walls! But with a bit of time and patience and the changes we've already made, it’s coming along nicely.
